> ## Documentation Index
> Fetch the complete documentation index at: https://docs.gorules.io/llms.txt
> Use this file to discover all available pages before exploring further.
# AWS ECS Fargate
> Deploy GoRules BRMS on AWS using ECS with Fargate and Aurora Serverless.
Deploy GoRules BRMS on AWS Elastic Container Service (ECS) with Fargate for serverless container management. This guide covers a scalable, cost-effective, and easily maintainable infrastructure.
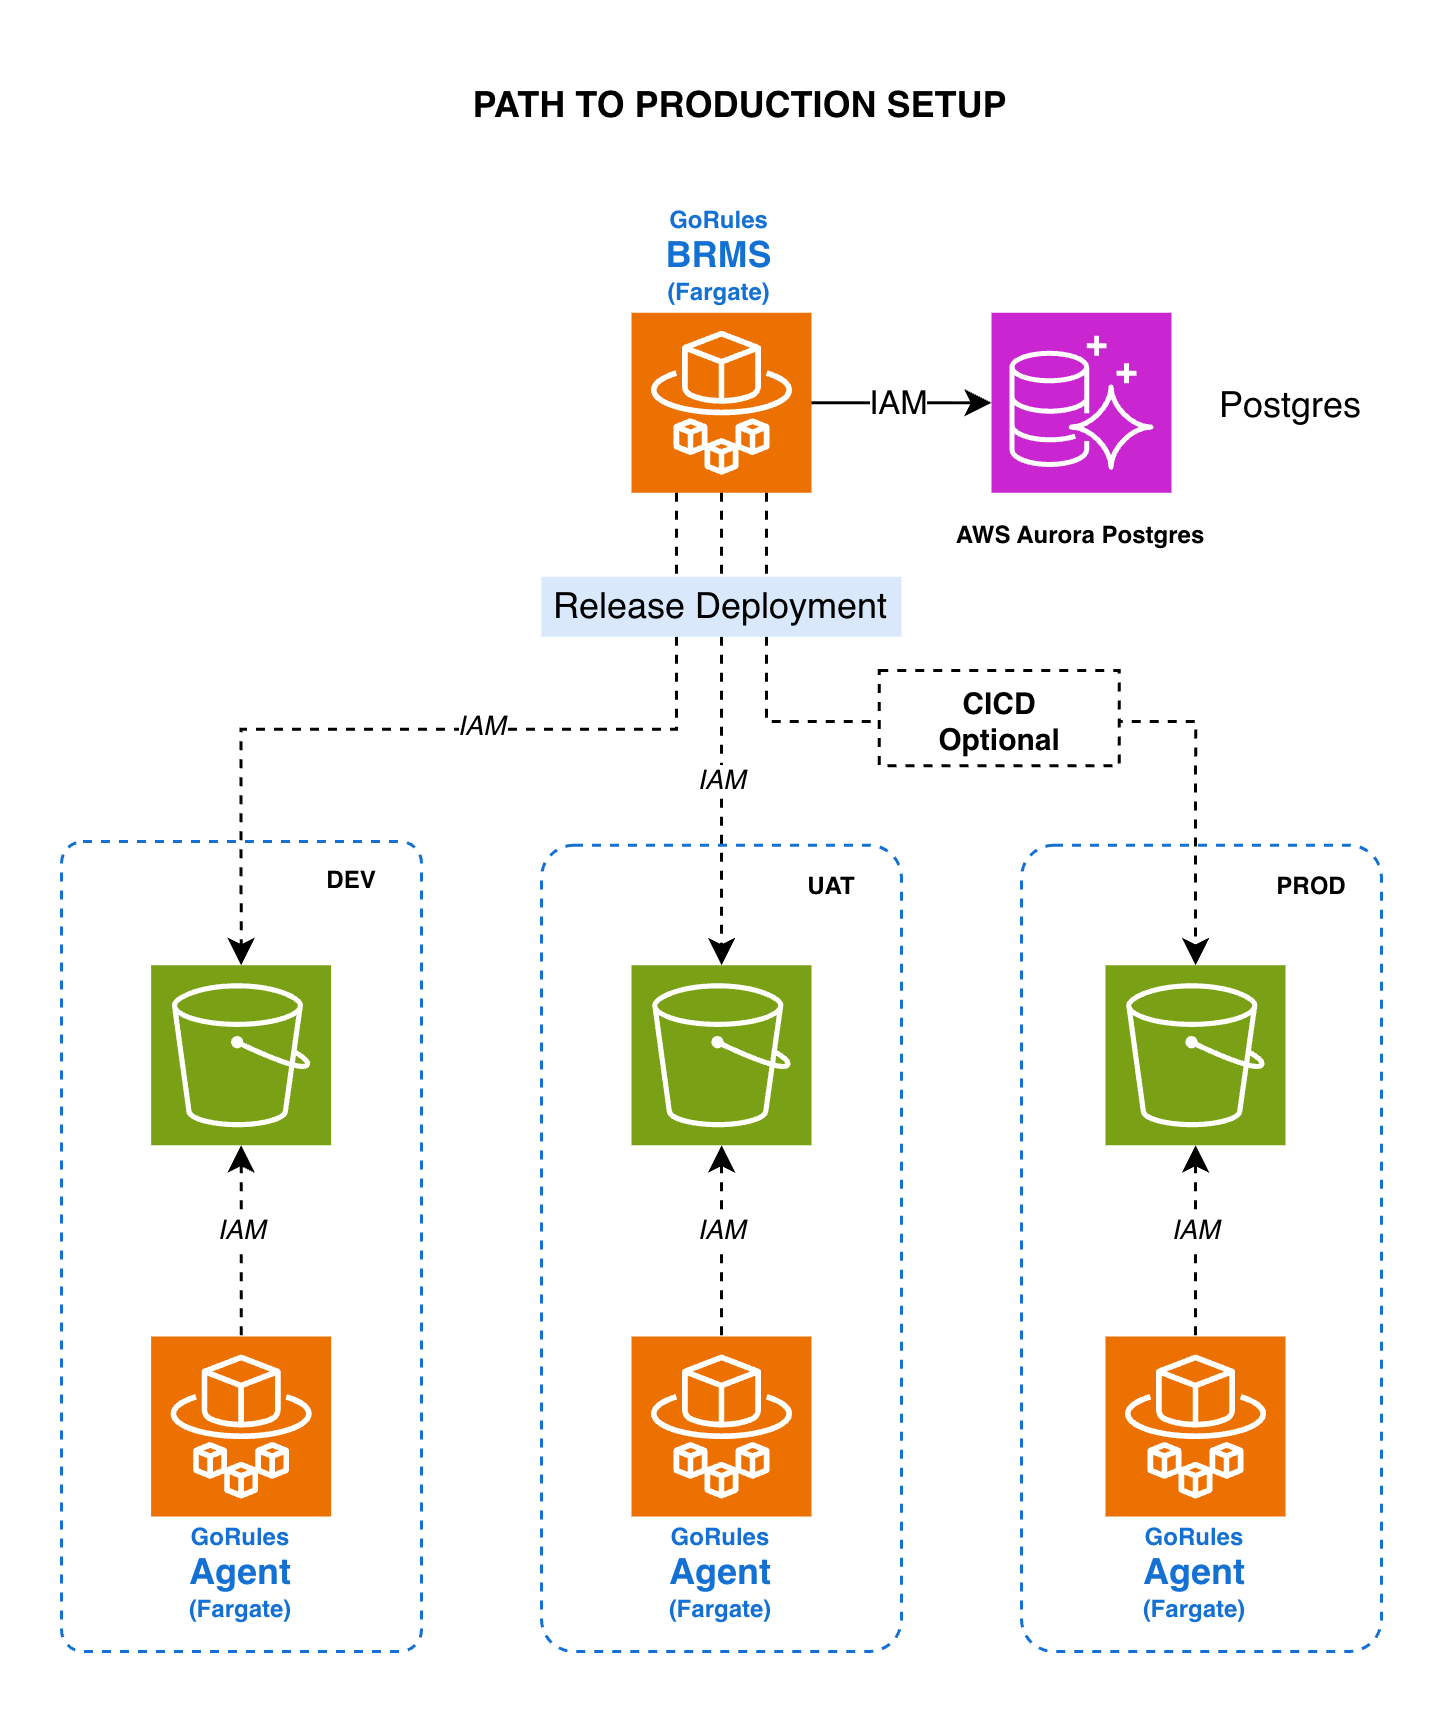
## Architecture overview
 **Components:**
* **GoRules BRMS** — Containerized application
* **AWS ECS Fargate** — Serverless compute engine for containers
* **Aurora Serverless v2** — Auto-scaling relational database
Terraform modules are coming soon.
## Database — Setting up Aurora Serverless
### 1. Initiate database creation
1. Log in to your AWS Management Console
2. Navigate to the RDS (Relational Database Service) dashboard
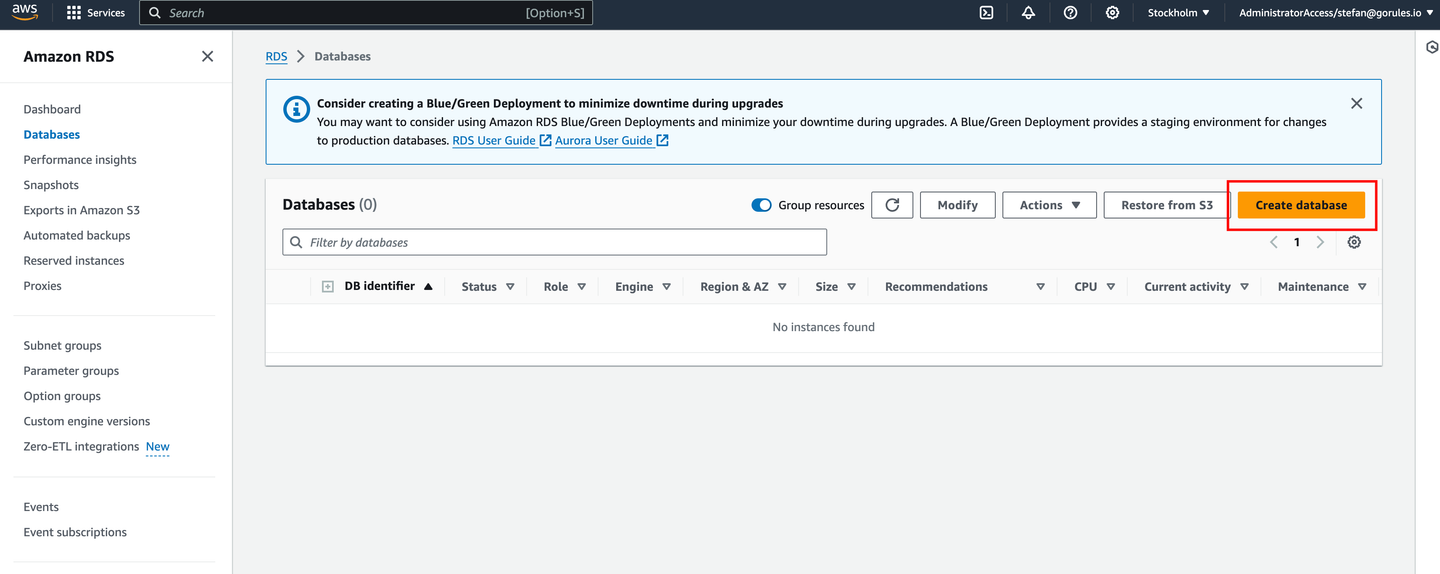
3. Click **Create database**
### 2. Choose engine options
1. Select "Standard Create"
2. Select "Aurora (PostgreSQL-Compatible)" as the engine type
3. Under templates, choose "Production" or "Dev/Test" depending on the environment
**Components:**
* **GoRules BRMS** — Containerized application
* **AWS ECS Fargate** — Serverless compute engine for containers
* **Aurora Serverless v2** — Auto-scaling relational database
Terraform modules are coming soon.
## Database — Setting up Aurora Serverless
### 1. Initiate database creation
1. Log in to your AWS Management Console
2. Navigate to the RDS (Relational Database Service) dashboard
3. Click **Create database**
### 2. Choose engine options
1. Select "Standard Create"
2. Select "Aurora (PostgreSQL-Compatible)" as the engine type
3. Under templates, choose "Production" or "Dev/Test" depending on the environment
 ### 3. Set up database credentials
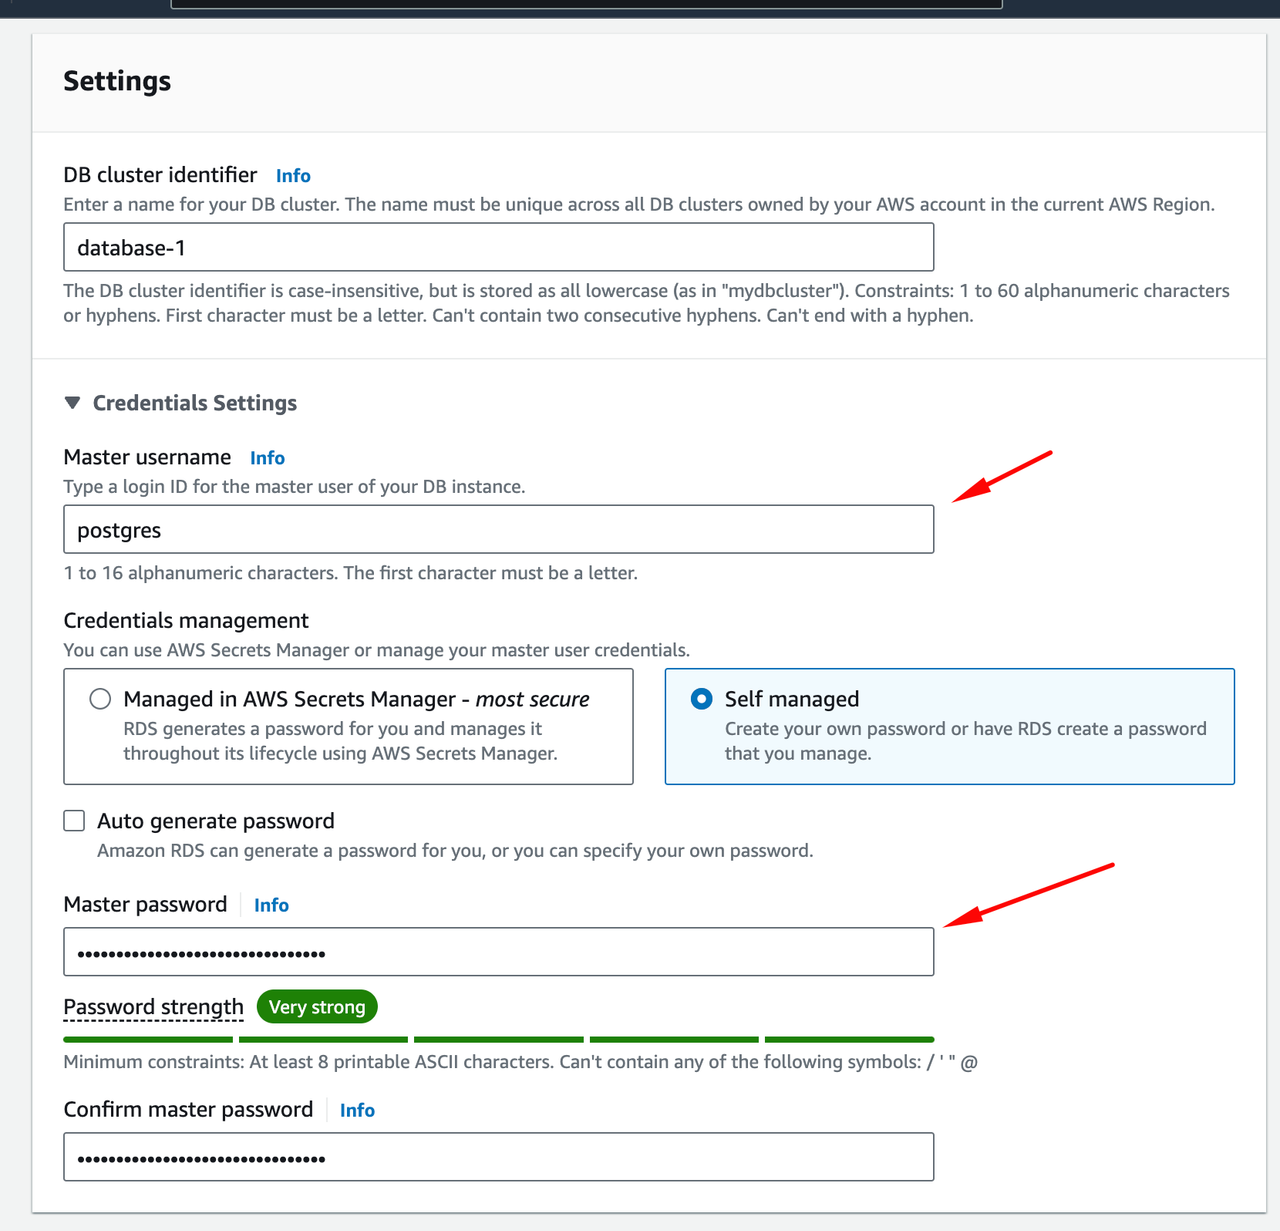
1. Set "DB cluster identifier" (e.g., `gorules-aurora-pg-cluster`)
2. Enter a master username (e.g., `gorules_admin`)
3. Manually create a strong password
4. Store this password securely; you'll need it later as an environment variable
### 3. Set up database credentials
1. Set "DB cluster identifier" (e.g., `gorules-aurora-pg-cluster`)
2. Enter a master username (e.g., `gorules_admin`)
3. Manually create a strong password
4. Store this password securely; you'll need it later as an environment variable
 ### 4. Configure database instance
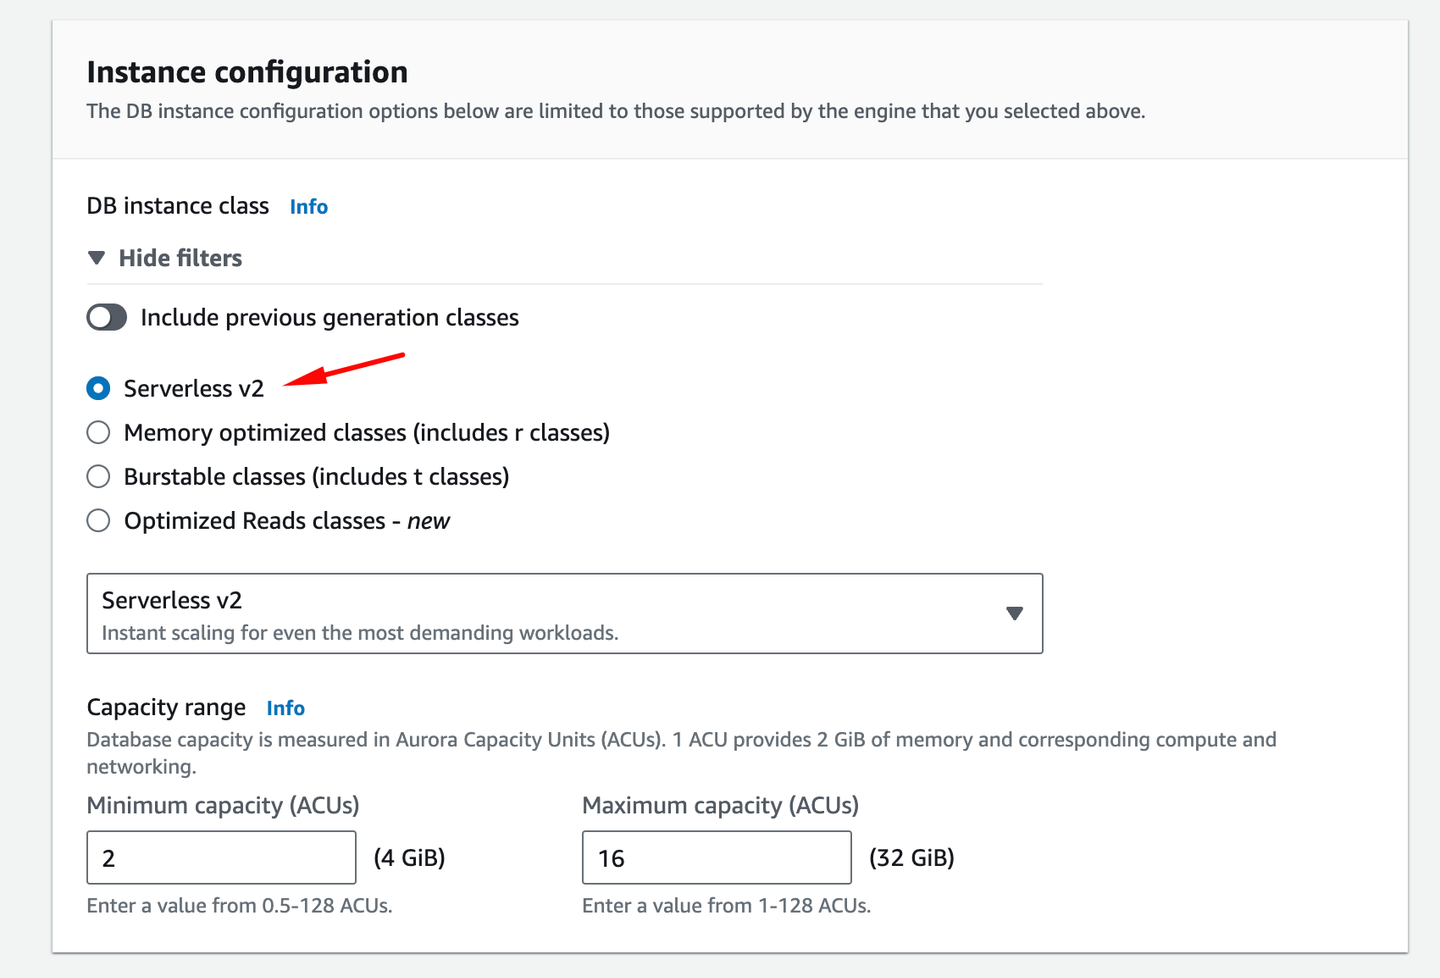
1. For "Capacity settings", choose "Serverless"
2. Set the minimum and maximum Aurora Capacity Units (ACUs) based on your expected workload
### 4. Configure database instance
1. For "Capacity settings", choose "Serverless"
2. Set the minimum and maximum Aurora Capacity Units (ACUs) based on your expected workload
 ### 5. Configure network and security
1. Choose the appropriate VPC for your ECS Fargate deployment
2. Select or create a new DB Subnet Group
3. For "Public access", choose "No" unless your architecture requires it
4. Create or select a VPC security group that allows inbound traffic on the Aurora port (default 5432 for PostgreSQL) from your ECS tasks
### 6. Additional configuration
1. Set the initial database name (e.g., `gorules_db`)
2. Configure backup retention period as needed
3. Enable encryption at rest (recommended)
4. Enable deletion protection (recommended)
### 7. Finalize and create
1. Review all settings
2. Click **Create database** at the bottom of the page
### 8. Wait for completion
1. The creation process may take several minutes
2. Monitor progress in the RDS dashboard
### 9. Retrieve connection information
Once the database is available, note down the endpoint. This endpoint will be used in your application's connection string.
Store the master password as an environment variable or in AWS Secrets Manager. Never commit sensitive information to version control.
## Container runner — Setting up ECS Fargate
### 1. Create ECS cluster
### 5. Configure network and security
1. Choose the appropriate VPC for your ECS Fargate deployment
2. Select or create a new DB Subnet Group
3. For "Public access", choose "No" unless your architecture requires it
4. Create or select a VPC security group that allows inbound traffic on the Aurora port (default 5432 for PostgreSQL) from your ECS tasks
### 6. Additional configuration
1. Set the initial database name (e.g., `gorules_db`)
2. Configure backup retention period as needed
3. Enable encryption at rest (recommended)
4. Enable deletion protection (recommended)
### 7. Finalize and create
1. Review all settings
2. Click **Create database** at the bottom of the page
### 8. Wait for completion
1. The creation process may take several minutes
2. Monitor progress in the RDS dashboard
### 9. Retrieve connection information
Once the database is available, note down the endpoint. This endpoint will be used in your application's connection string.
Store the master password as an environment variable or in AWS Secrets Manager. Never commit sensitive information to version control.
## Container runner — Setting up ECS Fargate
### 1. Create ECS cluster
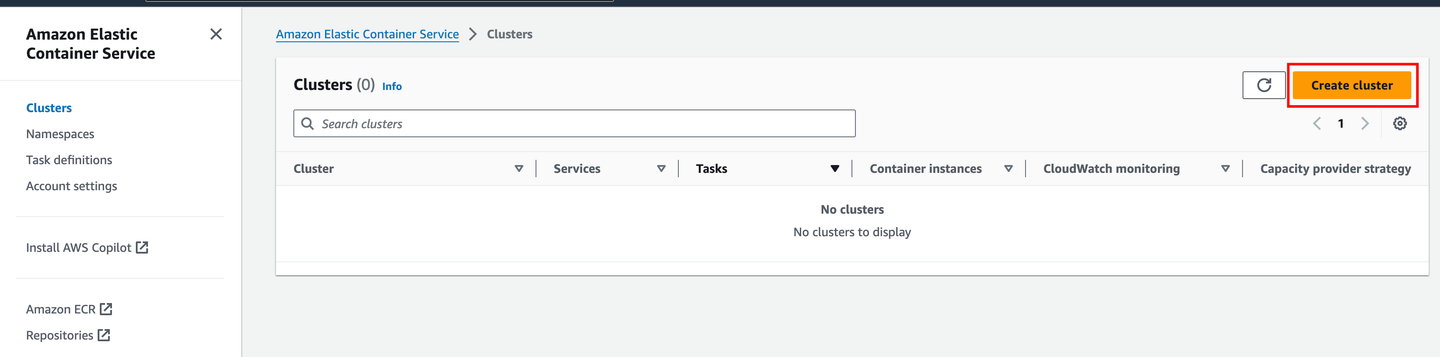 1. Navigate to the ECS dashboard in the AWS Management Console
2. Click **Create cluster**
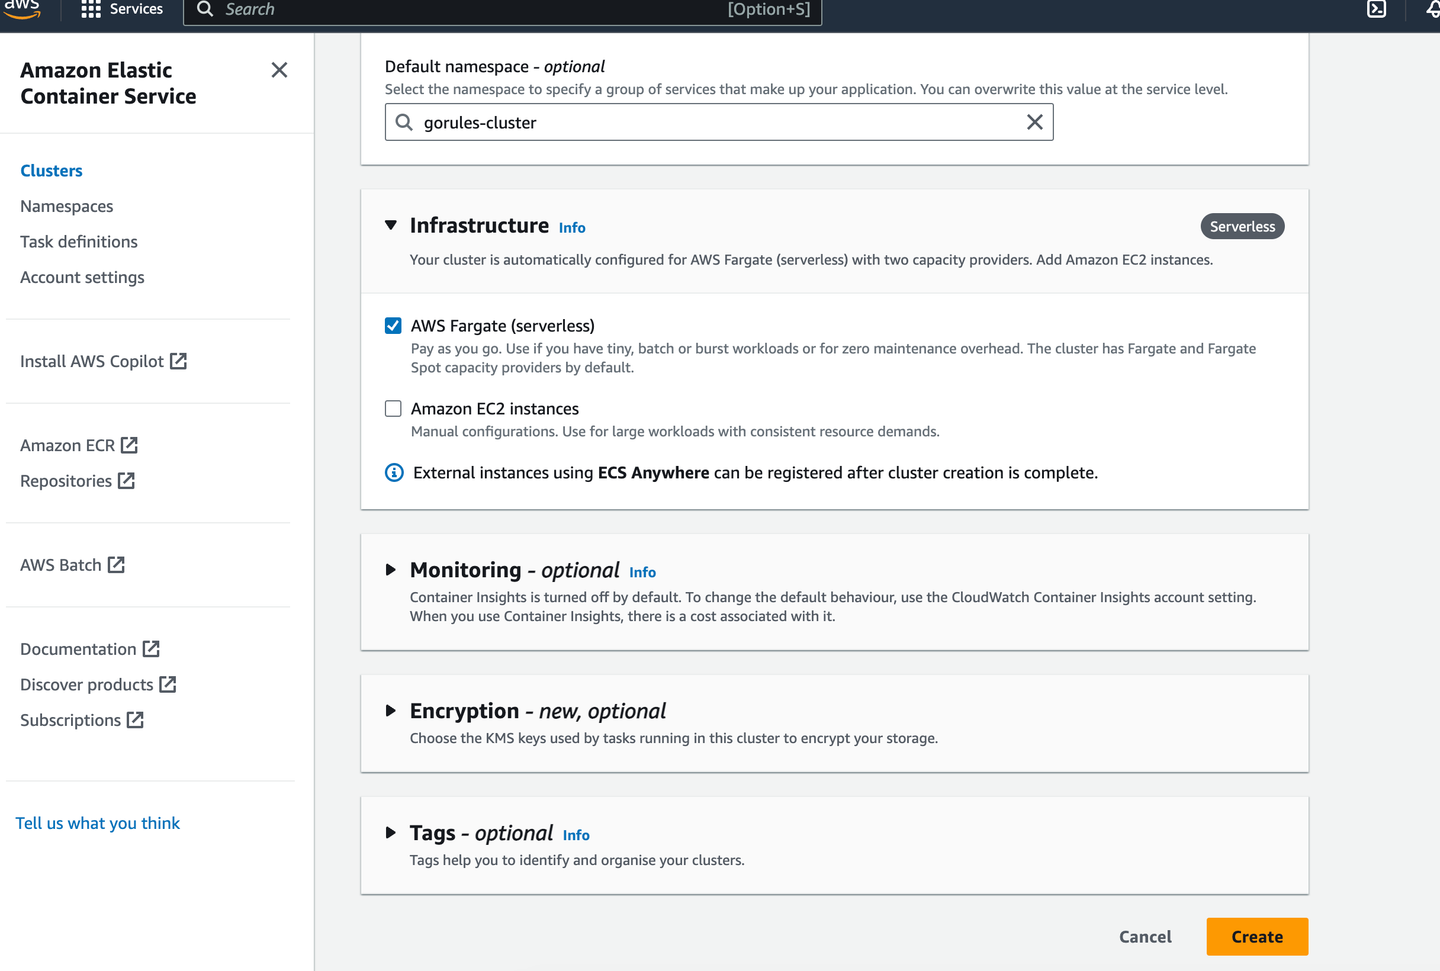
3. Choose "AWS Fargate" under infrastructure
4. Set Cluster name (e.g., `gorules-cluster`)
5. Optionally enable CloudWatch Container Insights and add tags
6. Click **Create**
1. Navigate to the ECS dashboard in the AWS Management Console
2. Click **Create cluster**
3. Choose "AWS Fargate" under infrastructure
4. Set Cluster name (e.g., `gorules-cluster`)
5. Optionally enable CloudWatch Container Insights and add tags
6. Click **Create**
 ### 2. Create task definition
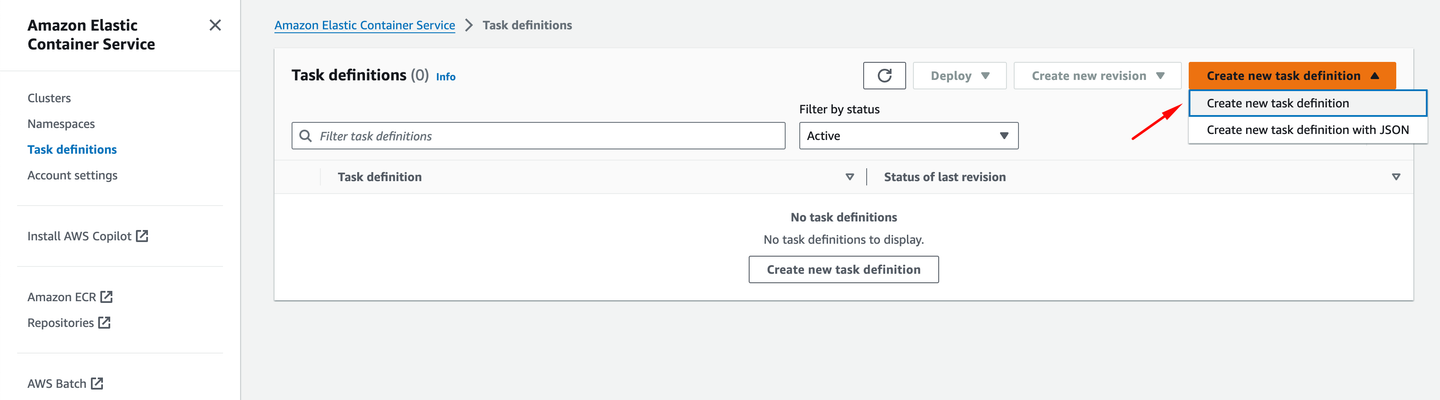 1. In the ECS dashboard, go to "Task Definitions" and click **Create new Task Definition**
2. Set Task Definition Name (e.g., `gorules-brms-task`)
3. Select "Fargate" as the launch type compatibility
4. Under architecture, choose Linux X86\_64
5. Set Task memory and CPU (for dev environment 0.5 CPU and 1GB RAM is enough)
6. Click **Add container** and configure:
* Container name (e.g., `gorules-container`)
* Image URI (from your ECR repository or other registry)
* Port mappings (Port 80)
* Environment variables (including database connection string)
7. Add any additional containers if required (e.g., for logging or monitoring)
8. Click **Add** to add the container to the task definition
9. Review and click **Create** to create the task definition
1. In the ECS dashboard, go to "Task Definitions" and click **Create new Task Definition**
2. Set Task Definition Name (e.g., `gorules-brms-task`)
3. Select "Fargate" as the launch type compatibility
4. Under architecture, choose Linux X86\_64
5. Set Task memory and CPU (for dev environment 0.5 CPU and 1GB RAM is enough)
6. Click **Add container** and configure:
* Container name (e.g., `gorules-container`)
* Image URI (from your ECR repository or other registry)
* Port mappings (Port 80)
* Environment variables (including database connection string)
7. Add any additional containers if required (e.g., for logging or monitoring)
8. Click **Add** to add the container to the task definition
9. Review and click **Create** to create the task definition
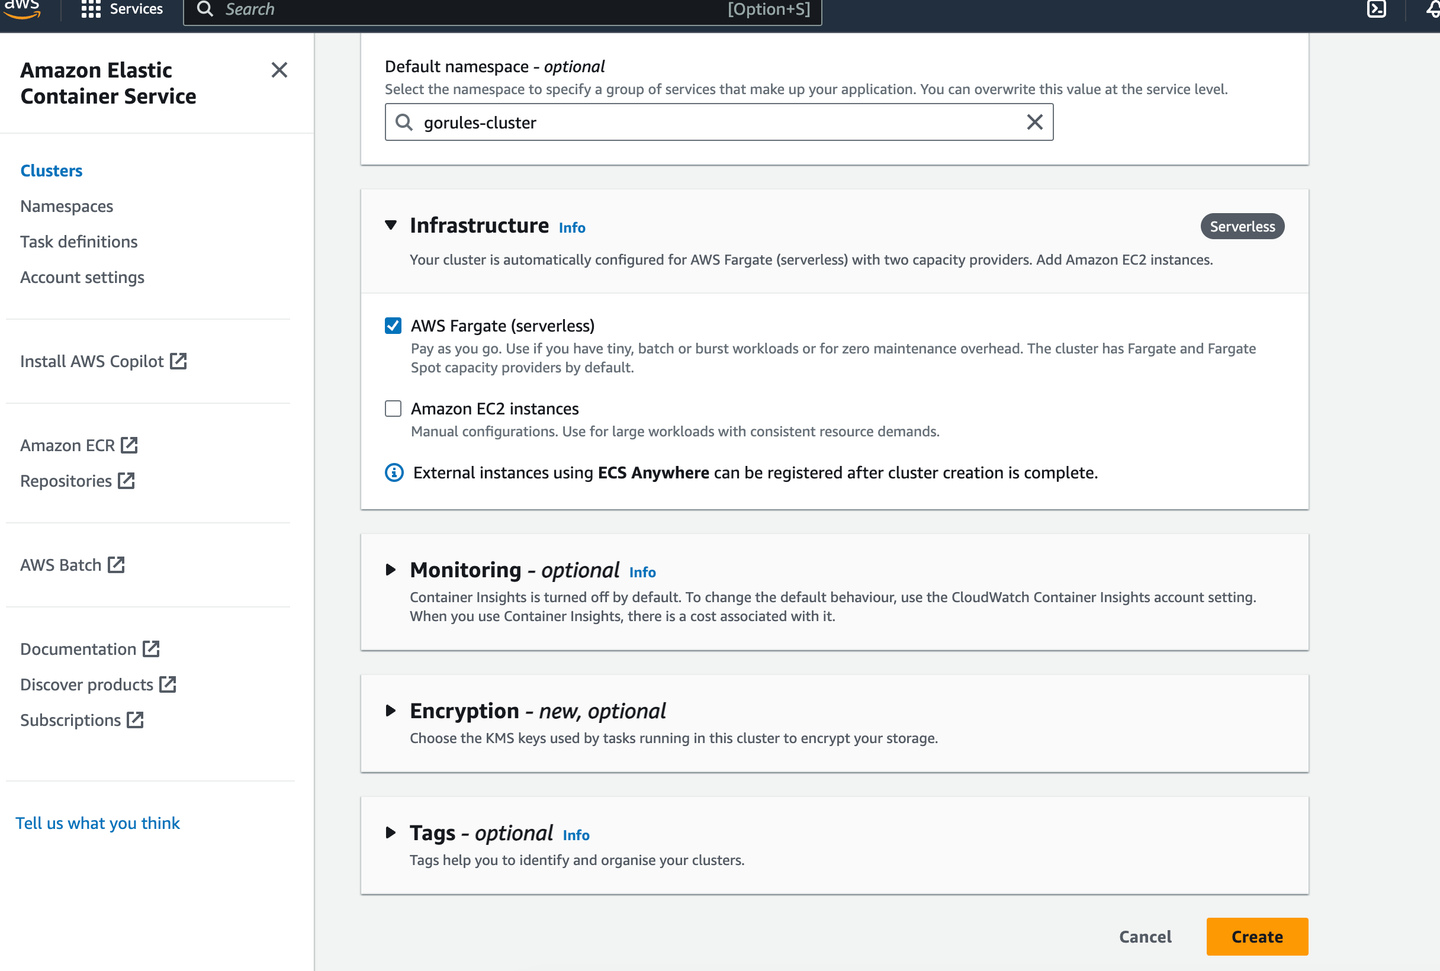 ### 3. Create ECS service
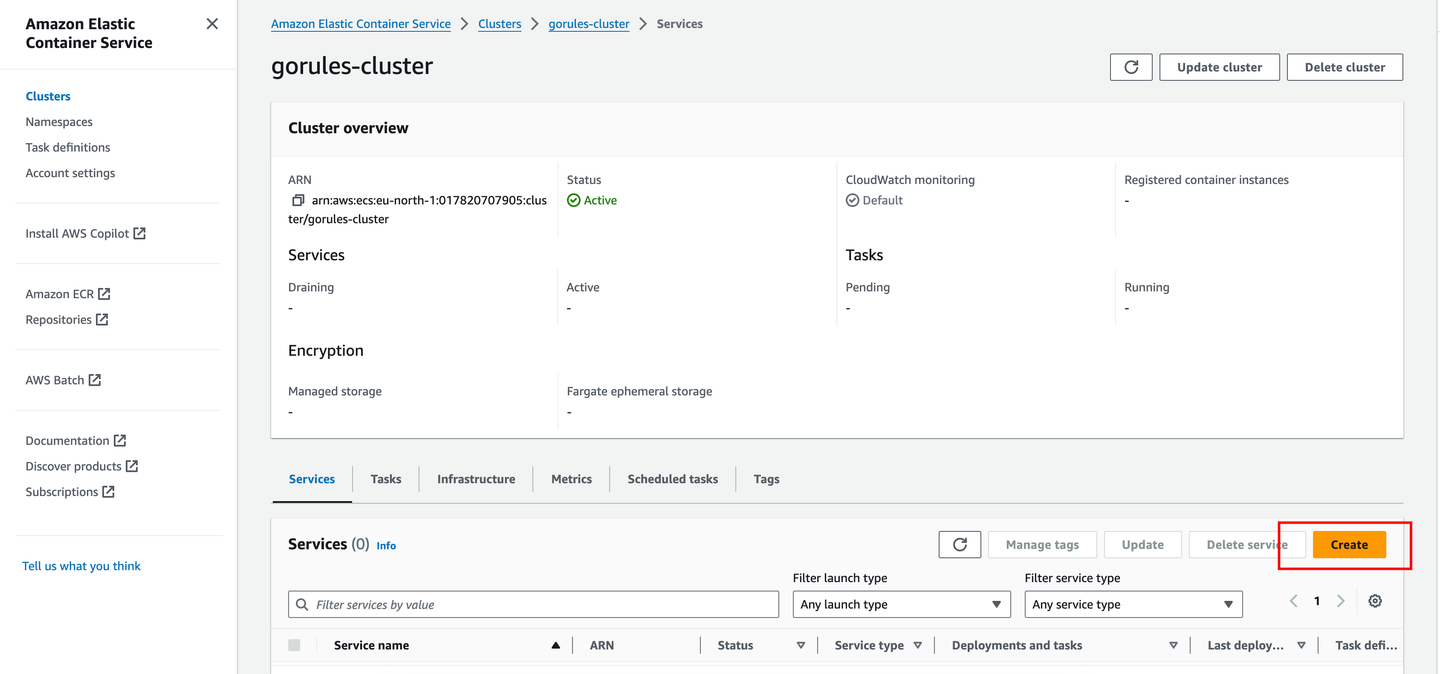 1. Go to your ECS Cluster
2. Click **Create** under the Services tab
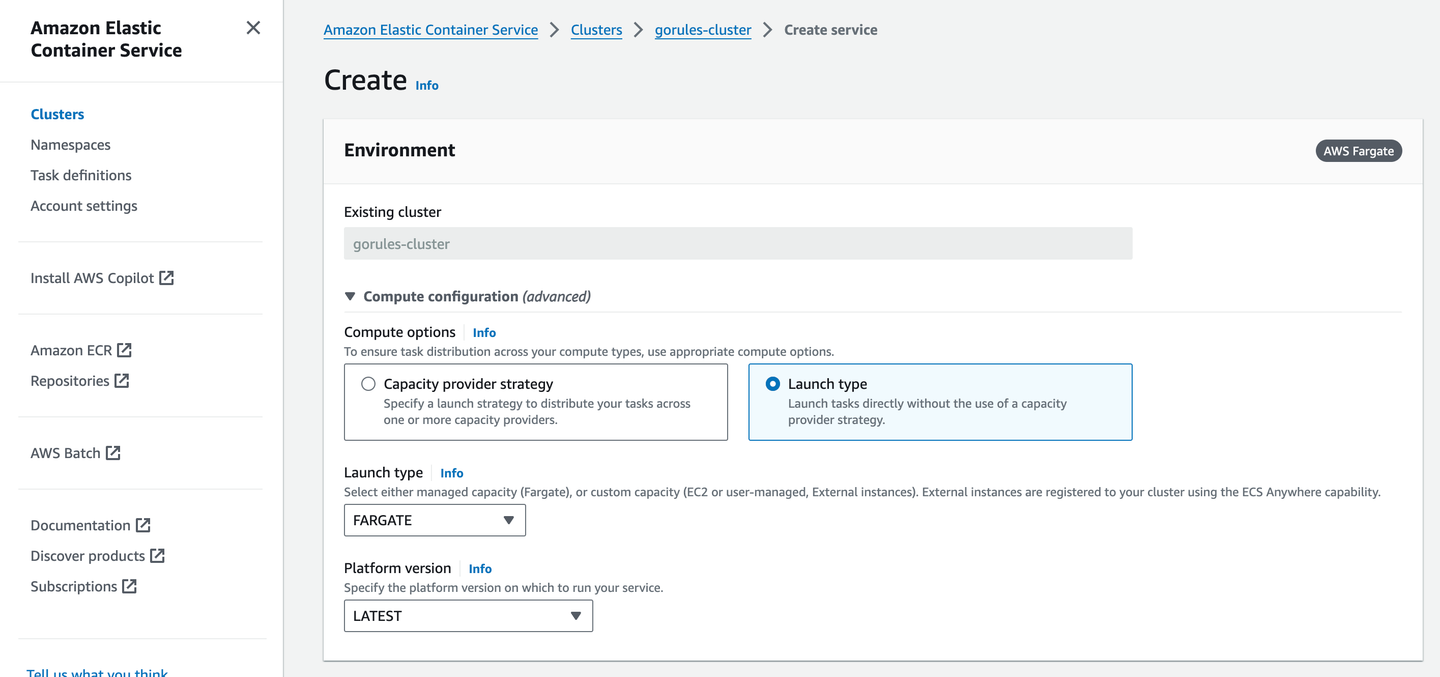
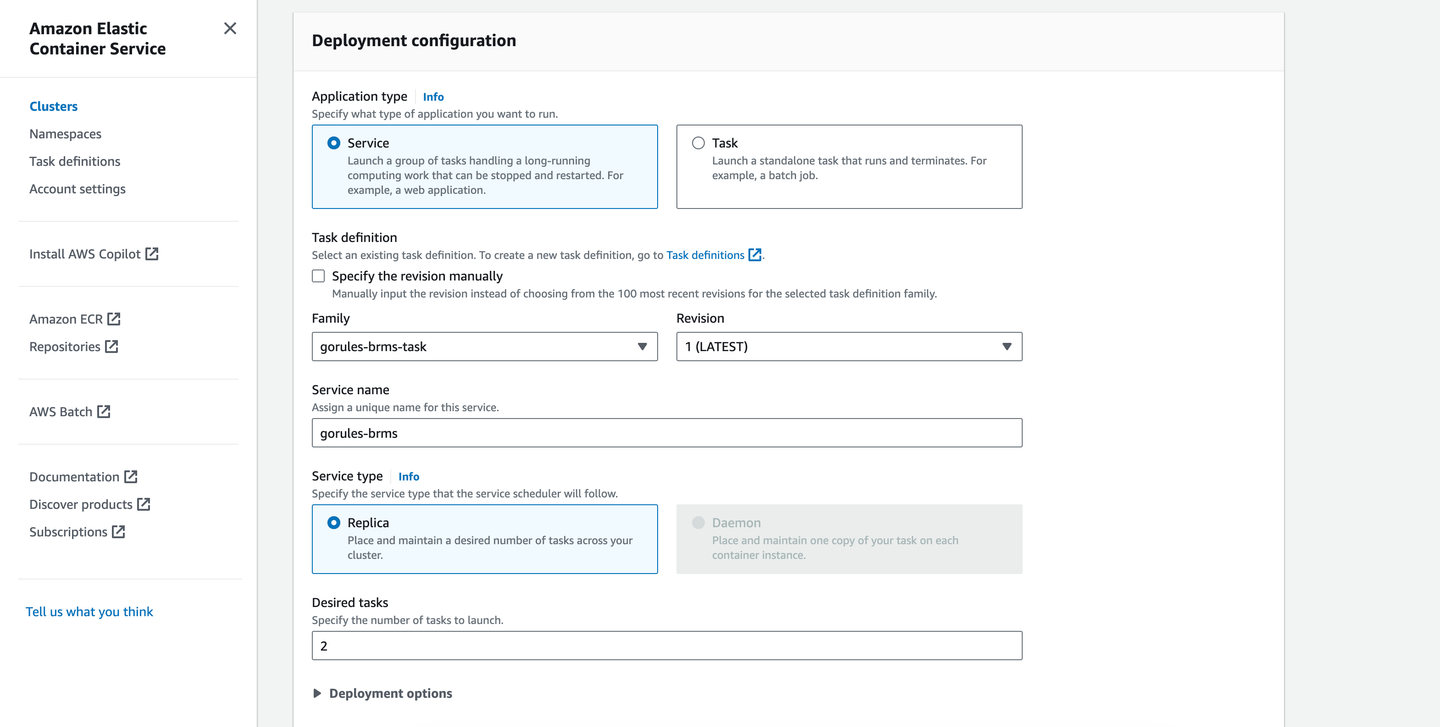
3. Configure the service:
* Capacity provider: FARGATE
* Task Definition: Select the task definition you created
* Service name (e.g., `gorules-service`)
* Number of tasks: Set based on your requirements
4. Configure networking if required
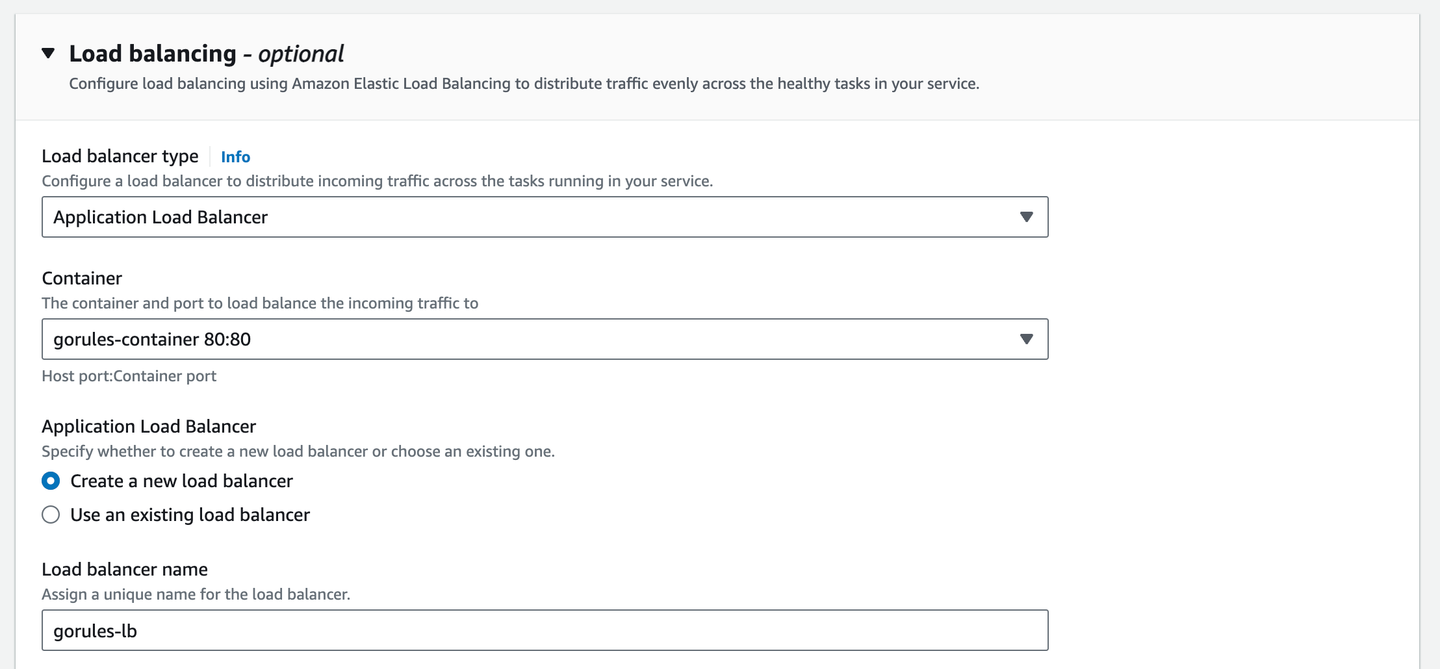
5. Configure load balancing (Application Load Balancer)
6. Set Auto Scaling if needed (optional):
* Configure service auto scaling based on CPU utilization or other metrics
7. Review and click **Create Service**
1. Go to your ECS Cluster
2. Click **Create** under the Services tab
3. Configure the service:
* Capacity provider: FARGATE
* Task Definition: Select the task definition you created
* Service name (e.g., `gorules-service`)
* Number of tasks: Set based on your requirements
4. Configure networking if required
5. Configure load balancing (Application Load Balancer)
6. Set Auto Scaling if needed (optional):
* Configure service auto scaling based on CPU utilization or other metrics
7. Review and click **Create Service**
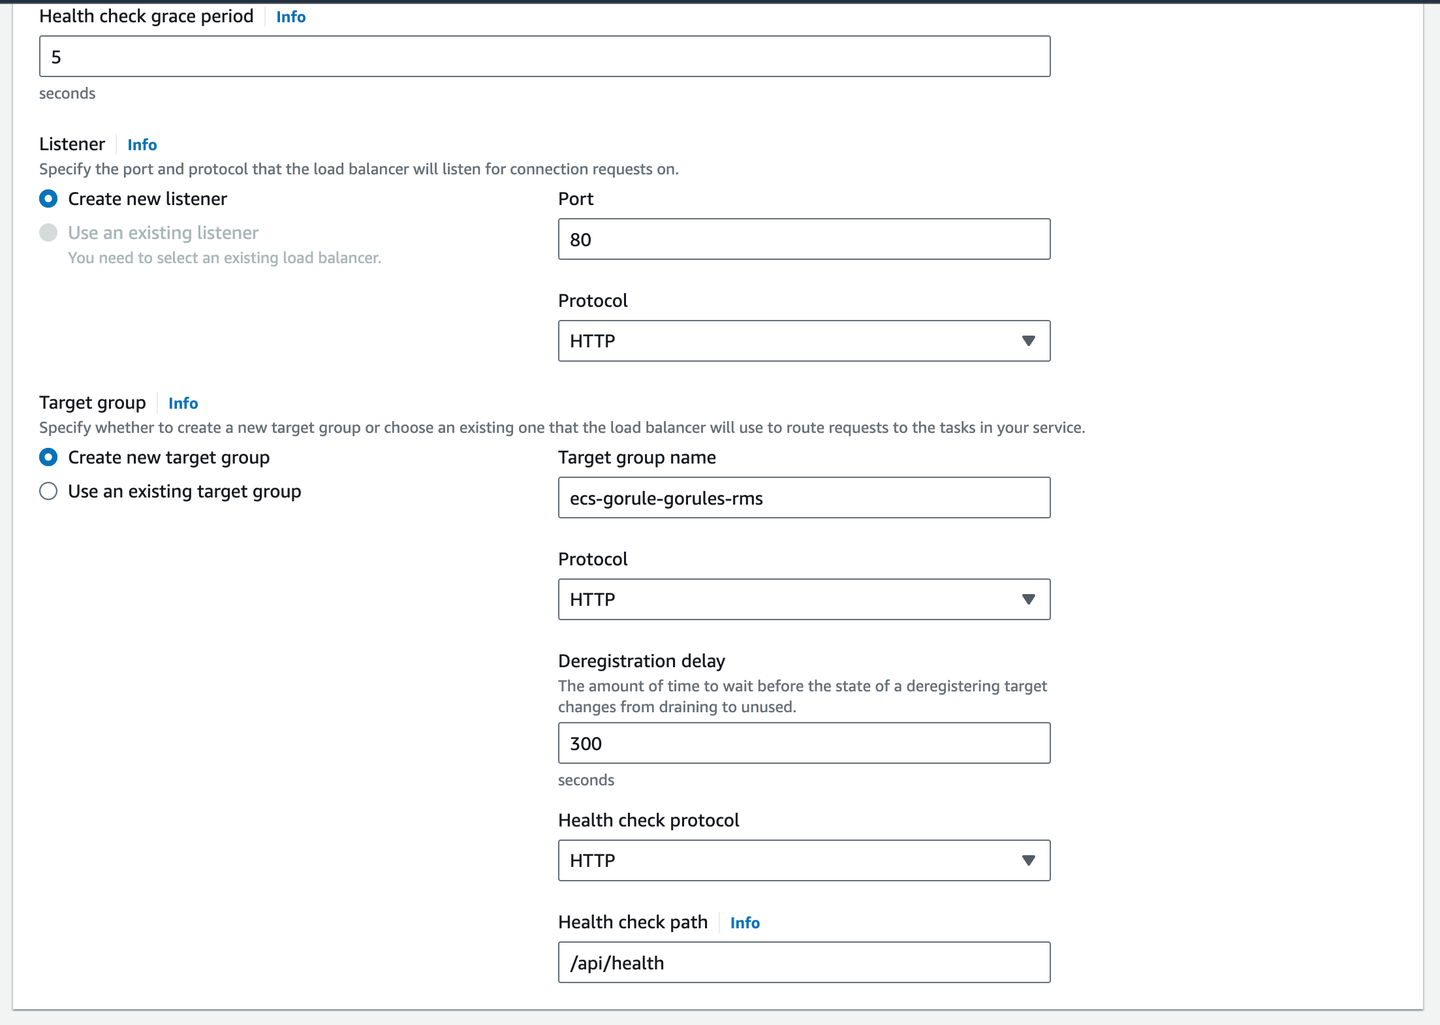 Monitor your ECS service in the AWS Console to ensure tasks are running correctly. Set up CloudWatch logs and configure alarms for notifications.
## Notes
* To make your service accessible, edit the security group and allow inbound traffic from all IPv4 (or configure appropriately for your needs)
* To obtain `DB_SSL_CA`, visit the [AWS RDS SSL documentation](https://docs.aws.amazon.com/AmazonRDS/latest/UserGuide/UsingWithRDS.SSL.html#UsingWithRDS.SSL.CertificatesDownload), find the certificate for your region, and use the [GoRules Base64 Certificate tool](https://gorules.io/tools/base64-certificate) to convert it
Monitor your ECS service in the AWS Console to ensure tasks are running correctly. Set up CloudWatch logs and configure alarms for notifications.
## Notes
* To make your service accessible, edit the security group and allow inbound traffic from all IPv4 (or configure appropriately for your needs)
* To obtain `DB_SSL_CA`, visit the [AWS RDS SSL documentation](https://docs.aws.amazon.com/AmazonRDS/latest/UserGuide/UsingWithRDS.SSL.html#UsingWithRDS.SSL.CertificatesDownload), find the certificate for your region, and use the [GoRules Base64 Certificate tool](https://gorules.io/tools/base64-certificate) to convert it